
Email overwhelm is one of the most common technology complaints that I hear from clients, and no wonder: the average office worker will receive an average of 12 emails every working hour, and send five an hour – about one every 10 minutes – according to the Radicati Group, which conducts large scale studies of how offices use technology.
The good news is that if your email is run through Gsuite or Gmail’s web interface (most commonly accessed via https://mail.google.com) there’s a plethora of simple tools you can take advantage of to tame your email influx.
Gmail Labels – Organize Your Inbox
Why Gmail Uses Labels Rather than Folders
Gmail calls their folders “labels,” which is why so many people think they can’t use folders in Gmail. Why the name change? Because a letter can have more than one label stuck to it, but in real life, it couldn’t be in two separate folders. Still, Gmail labels are so functionally close to folders that they still use the folder icon to represent them.
However they’re represented, labels are an important improvement over a regular inbox folder. To see why, imagine that you create a folder for each one of your clients so you can easily look up requests regarding their account, and another folder in which you store contracts. What happens when you receive an email that contains the client’s signed contract AND a note about the project you are about to do for that client? If you’re using traditional inbox folders, you have to make a decision: Do you file the email under contracts, or under the client’s name? Both options are a little right, but both options are also a little bit wrong. With Gmail or Gsuite, you don’t have to make this decision — the email can be placed in both “folders” (labels) at once.
Apply Labels to Emails
From the Inbox
You can label multiple emails at once from the inbox. Start by placing a check mark next to each of the emails you’d like to apply your first label to.
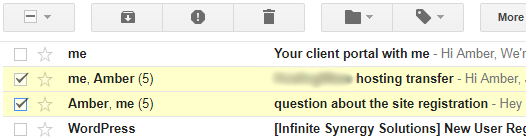
Click the “folder” icon to open the label menu.

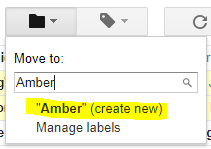
The moment the label menu opens, you can begin typing the name of the label you want to apply to these emails. If the label already exists, the list of labels will shorten until only the label you want is left. When this happens, press enter, and the label will be applied.
If this is the first time you’ve used this label, click Create New to create it.
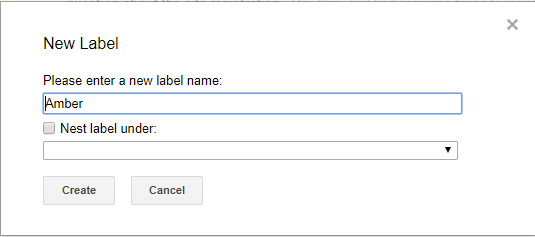
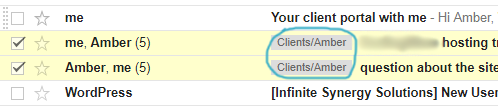
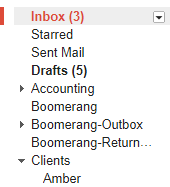
You’ll get the opportunity to make edits to the label name, and even to nest it under another label (think subfolder.) Most of my labels are nested under a label I call “Clients.” Click Create to finish.
Your labels are now applied to your emails!
While Viewing an Email Thread
If you’re looking at an individual email thread, you’ll follow almost exactly the same steps. The only difference is that you will start the process by clicking the “folder” icon at the top of the email thread.

Removing Labeled Emails From Your Inbox
When a new email arrives in a labeled thread, that thread will return to your inbox. Its labels will NOT be removed when this happens. Remember, labels are different than folders. An email that has labels on it can be taken out of a folder and placed in your inbox, and still have those labels stuck to it.
This is useful because it means that there is one central location for you to look for new emails. Imagine having to look through dozens – or hundreds- of labels to see if there was something new in one of them every time you checked your email! You’d definitely miss something.
After you’ve read/responded to an email and no longer need to see it all the time, click the “archive” button to remove the email from your inbox.

The email can still be easily called up by its label, just as if you were opening a folder of that name, but it won’t clutter your inbox. If you always archive emails when they no longer need your response, you’ll always be able to see what messages are new and waiting for your attention.
We recommend that you never delete emails from clients or vendors; instead, archive those emails, so you can always refer back to them later. You’ll never know when a small detail will turn out to be crucial, and when you’ll need it again!
Viewing Labeled Emails
So you’ve labeled your emails and swept them out of the inbox, and now you want to find all those emails again. Your labels live in the left-hand side of your inbox. Click on any label name to show all emails that bear that label. This will feel exactly like opening a traditional folder.
Narrowing Your Search
When you click on a label, something magical happens: that label is added to your Gmail search bar, like this:

Click in the search bar and add search terms to that label search, and you can search for emails that contain specific words AND wear that label.

Think of it like searching within a folder. With these techniques, you’ll be able to rapidly locate whatever you need in your inbox without sifting through hundreds of irrelevant matches.
To take your Gmail labels to the next level, join us in the next article on using Gmail filters to automatically label emails.


Leave A Comment