If you’re not sure what a Gmail label is for or how to work them, I recommend that you read our article Organizing Your Gmail Inbox – Using Labels and Folders before diving into how this material on how to automatically apply them.
You can have labels automatically applied to incoming emails based on a number of criteria – sender, subject line, even a specific phrase appearing in the email body. For the purposes of this tutorial, we’ll take one of the most common and simple use cases: Filing emails from a specific person (or group of people) with a label of their company name.
Let’s pretend that you want to add the label “Infinite Synergy Solutions” to emails that you receive from me, Kim.
Start by finding an email from me (Kim) in your Gmail. Open that email, and click the “More” button at the top.
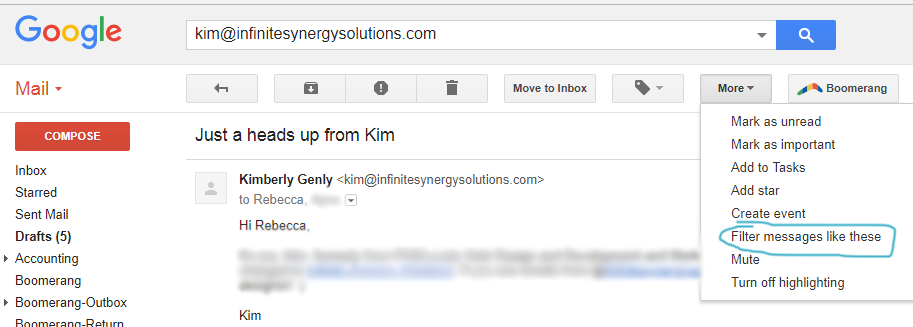
In the “More” dropdown, choose “Filter messages like these.”
You’ll see a panel like this one:

Click the blue “Create filter with this search” link at the bottom of the panel, which will take you to step two: defining what will happen when you receive an email from me. Find the option I’ve highlighted below, “Apply the label:” and put a check in its box.
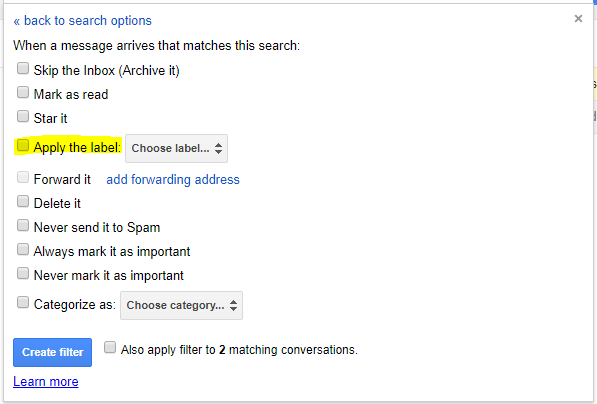
From there, it’s as simple as selecting (or creating) the label you’d like to apply from the “Choose label” dropdown.
Other Gmail Filter Options You Might Like
As you can see, there are plenty of other options we can select when auto-filtering messages. Here’s a short explanation of some of the most popular:
- Skip the Inbox (Archive It) – This will stop the filtered emails from ever appearing in your inbox — the only way to view them would be to deliberately open the label you’re placing it in. I recommend that you do not use this option for client or customer emails. Instead, let emails from real people appear in your inbox, then use the “Archive” button to whisk them away to their pre-applied label files when they are no longer waiting for a response from you. This will help to ensure that time-sensitive emails always appear where you’ll notice them. By contrast, if you are filtering a daily newsletter that needs no response from you, and you simply save them to read when you have some spare time, that is a perfect scenario for having your filtered emails skip the inbox.
- Forward It – If there is some material that you always needs to share with a particular person, this can be very useful. For example, emails from a particular person that should always go to your lawyer, or emails from your receipt tracking app that should always go to your bookkeeper.
- Delete It – In most cases, I’d recommend using the “Archive It” option over the Delete It option. You just never know when you’re going to need to reference something. However, there are some emails you simply never need to see or reference again that you may prefer to simply trash. Use with care!
- Never send it to Spam – It’s not a bad idea to check this for emails you recognize, such as emails belonging to your clients, customers, or colleagues. This option can also be useful if you are subscribed to a forum or newsletter that sends you updates often enough that your automatic spam filters sometimes mistakenly kick in and prevent you from getting wanted updates.
- Always mark it as important – Have a big client whose emails you never want to miss? Use this option to have those emails appear at the top of your inbox.
- Apply filter to X matching conversations – This is the magic bullet if you have months or years of unorganized emails already in your inbox. Check this box to retro-actively apply your filter as well!
For more great tips to mastering your inbox, check out the other articles in the Email section of our Learning Center.


Leave A Comment